Post Deployment Tests on Azure DevOps using Pester
Post deployment tests provide additional confidence that unit tests or self-contained integration tests will not, as the tests themselves are interrogating a live instance of your application as a black box, rather than mocking aspects of your application like unit tests as a white box. In this post, I will run through how I do this with release pipelines on Azure DevOps using Pester as a testing framework.
The code for this post is on GitHub. The repository contains a .NET project called CoolApi.csproj with two PowerShell Scripts Invoke-Tests.ps1 and Invoke-TestsAfterDeployment.ps1. You can choose to fork or copy and paste into a private repository and follow on.
The Build and Release Pipeline
In this step we’ll setup the build and release pipeline for the CoolApi without tests. Feel free to skip this step and go straight to the next section if you already have a deployed application.
To start, setup a build pipeline on Azure DevOps. You can use your application or my CoolApi from the repository above, it already contains a build.yaml file so you can use this to quickly setup your build definition.
Next step, setup a release pipeline on Azure DevOps. I’ve setup my CoolApi to deploy into an Azure Web App by using the task from the marketplace called Azure App Service Deploy.
Pester Tests
We need two PowerShell scripts to setup before integrating them into our release pipeline. The first one is the actual test script that interrogates our application called Invoke-Tests.ps1.
param (
    [Parameter(Mandatory=$true)]
    [string]
    $Api
)

[Net.ServicePointManager]::SecurityProtocol = [Net.SecurityProtocolType]::Tls12
Describe "Example API ('$Api') Tests" {
    It "Should GET" {
        $result = Invoke-WebRequest -Uri "$Api/api/Cool" `
                                    -Method GET `
        $result.Content | Should -Not -Be $null
    }

    It "Should POST" {
        $result = Invoke-WebRequest -Uri "$Api/api/Cool" `
                                    -Method POST `
        $result.Content | Should -Not -Be $null
    }
}
Windows 10 will automatically detect you’re using Pester from the keywords Describe, It, and Should. The above script accepts a parameter -Api. It then proceeds to do a test on the POST and the GET verbs on that Api using Pester.
If you want to run the tests locally you’ll need to run the CoolApi on a console like this
dotnet run
and on another console you can run this:
.\Invoke-Tests.ps1 -Api "https://localhost:5001"
You should get a reponse like below:
Describing Example API ('https://localhost:5001') Tests
  [+] Should GET 1.73s
  [+] Should POST 179ms
The next script we need is a wrapper around the above script called Invoke-TestsAfterDeployment.ps1. This wrapper will be invoked from the release pipeline directly.
param(
  [Parameter(Mandatory=$true)]
  [string]
  $Api,

  [Parameter(Mandatory=$true)]
  [string]
  $ScriptPath
)

Install-Module -Name Pester -Force -SkipPublisherCheck

Import-Module Pester

$testResults = Invoke-Pester -Script @{Path = "$ScriptPath\Invoke-Tests.ps1"; `
                                       Parameters = @{Api = $Api}} `
                             -OutputFile Test-Pester.XML -OutputFormat NUnitXML `
                             -PassThru

if ($testResults.FailedCount -gt 0) {
    Write-Error "Failed '$($TestResults.FailedCount)' tests. Release Failed."
}
There are a few things we have to consider here:
- This script path accepts a parameter
ScriptPath. This will be where the test script is located on the build agent. - It imports the Pester module in case it’s not on the build agent.
- It Invokes Pester using the Pester API
Invoke-Pesterand creates a file calledTest-Pester.XMLusing NUnit XML result format. This XML file is needed so that Azure DevOps can report on the status of individual tests. - The
-Scriptparameter onInvoke-Pesteris passed the path of the Pester test script and it’s parameters. - A
-PassThruflag is used so thatInvoke-Pestercan generate an object that can be analysed. - The object returned from
Invoke-Pesteris examined. If one or more failing tests are present then the release will fail.
Adding the Tests to the Release Pipeline
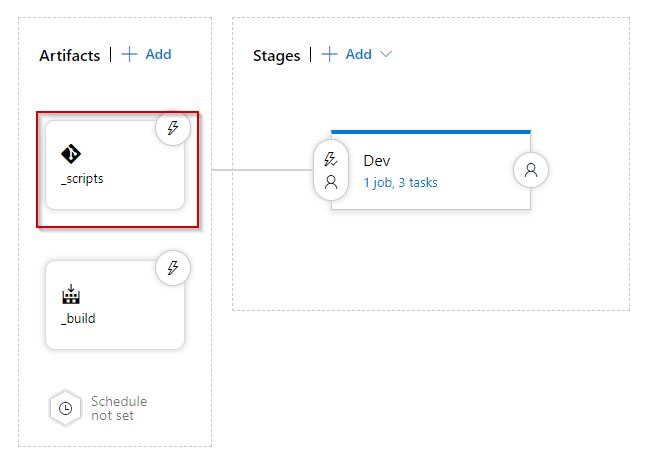
After you’ve committed these PowerShell scripts you’ll need to integrate them into your release pipeline. Edit your release pipeline and add them as an artifact. You have two options. Either adding them as an artifact as part of a build or adding them directly from a git repository. I’ve added them directly from a git repository.

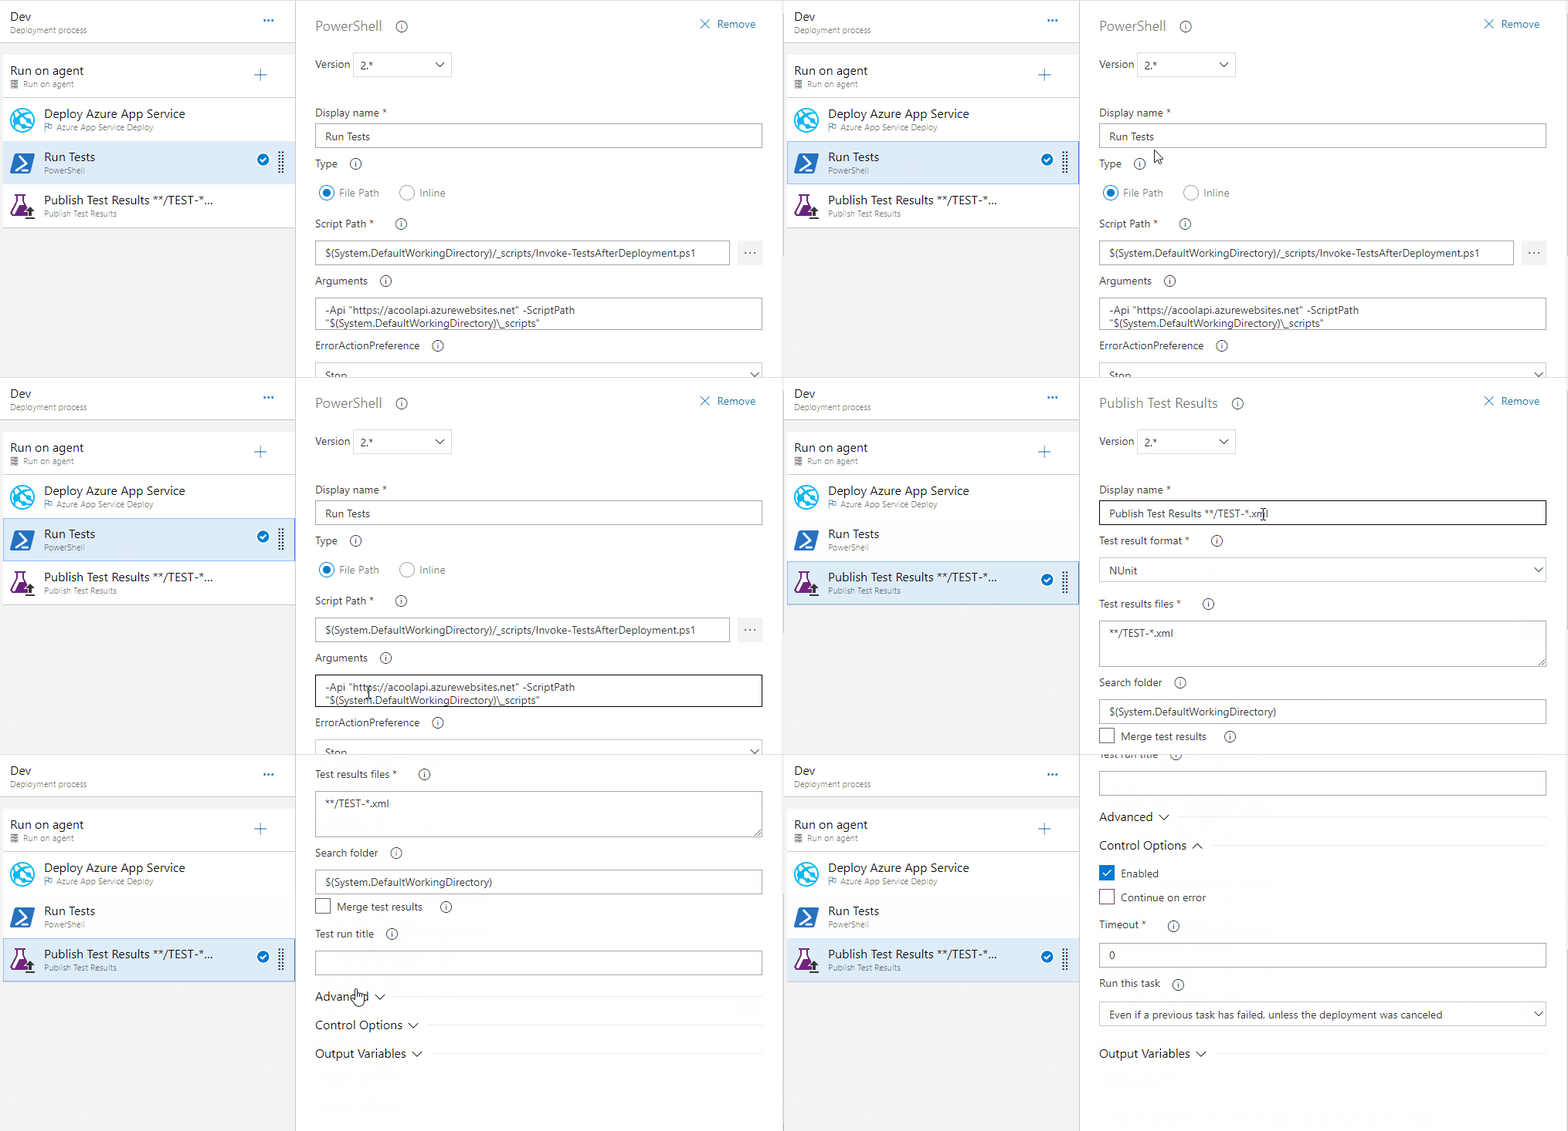
Edit your environment and add a PowerShell task. Match the fields below
- Display Name: Make this Run Tests. It’s only used for visibility purposes.
- Script Path: Make this
$(System.DefaultWorkingDirectory)/_scripts/Invoke-TestsAfterDeployment.ps1. You can use the elipses to locate this as well. - Arguments:
-Api "{{YOUR_API_HERE}}" -ScriptPath "$(System.DefaultWorkingDirectory)\_scripts". In my case the-Apiishttps://acoolapi.azurewebsites.net. Notice that the-ScriptPathis the same location as theInvoke-TestsAfterDeployment.ps1script.
After this step you’ll need to add a step Publish Test Results. Change the fields to look like:
- Test result format: should be NUnit as this is what
Invoke-Pesterwill produce from our wrapper script. - Run this task: Under the Control Options change this field to Even if a previous task has failed, unless the deployment was canceled. We want the test results to publish even if tests for a particular environment have failed.
The resulting release definition should look like this:

Test Publishing
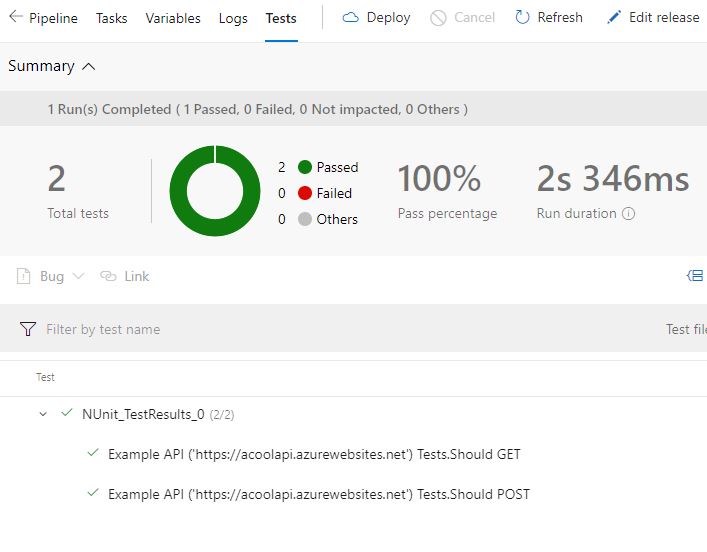
If you run the release you will get a list of tests in the test tab of your release.

Failing Tests
Push a failing test to your repository and test the script again. In your Invoke-Tests.ps1 file add this
Describe "Test Failure" {
    It "Should Fail" {
        $false | Should -Be $true
    }
}
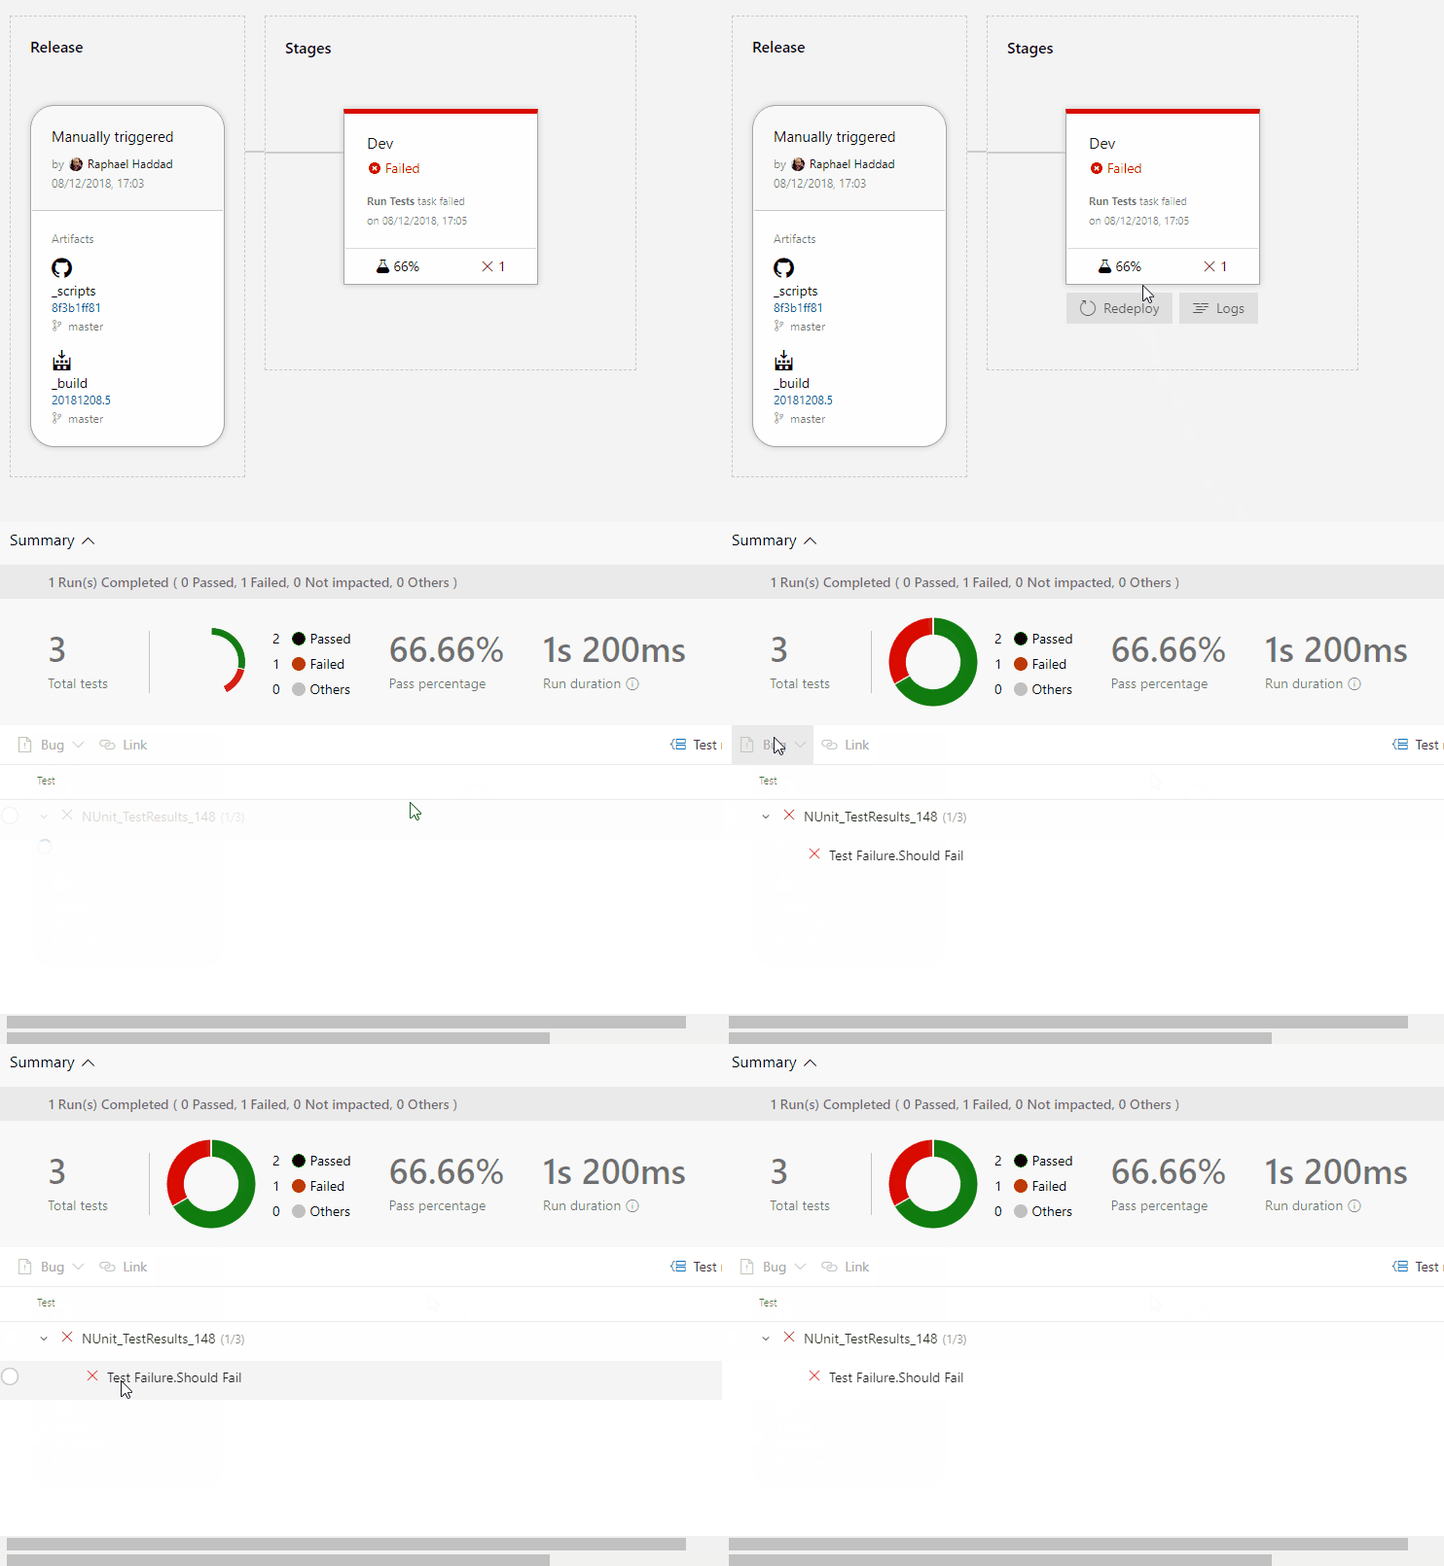
Azure DevOps will present a failed release with failed tests.

Conclusion and Troubleshooting
You now know how to run post deploy scripts on Azure DevOps release pipelines. You may experience some issues such as:
No Tests Appearing in the Test Tab
- Make sure you call
Invoke-Pesterwith an output formatNUnit. - Make sure you’ve added a Publish Test Results step and the control option as Even if a previous task has failed, unless the deployment was canceled.
Deployment not Failing When Tests Fail
- Make sure you’ve used the flag
-PassThruand have checked the propertyFailedCountfrom the object returned fromInvoke-Pester.
Script is Not Appearing as An Artifact
- Make sure the script is included as part of your build artifact or that you’ve published it as a build artifact.
Thank you for reading this blog post. If you have any suggestions please feel free to contact me!