Monorepositories in Azure DevOps
There are many advantages associated with monorepositories including (among other things):
- Contractual changes between components (services, user interfaces, and
databases)
can be pull requested into
mastertogether as a single unit of integration, thus reducing the risk of version inconsistencies between components; - Documentation as code and production code can be pull requested into
mastertogether as a single unit of integration, thus limiting the risk of documentation drift; - Local development setup doesn’t assume the path of components, thus limiting the risk of divergent local development environments across the development team; and
- Consistent patterns across code-bases can be enforced more easily. This include things such as naming conventions, where to put Docker files, and infrastructure as code.
In this post, I’ll demonstrate how to setup monorepositories within Azure DevOps.
All code for this post is hosted here: https://github.com/RaphHaddad/monorepos-example
What is a monorepository?
A monorepository is a single git/hg/svn repository that is a collection of code-bases. In a typical setup, the collection of code-bases are separated on the path level where the first part of the path corresponds to a separate code-base. Basically, each code-base has its own folder in the repository.
I’ve got an example README.md file for monorepositories here: https://gist.github.com/RaphHaddad/649d58e7fc18cb26cb10b2d6e49f0cdc
Targeting different continuous integration builds for individual code-bases
A monorepository will have several builds associated with it due to the nature of the monorepository having multiple code-bases. The desired effect is to trigger a Continuous Integration (CI) build for a particular code-base in the monorepository only if its corresponding code has changed.
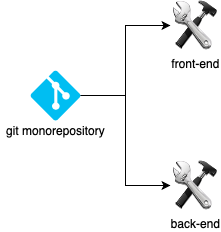
For example: suppose a monorepository has two folders front-end and
back-end and I have two builds CI front-end and CI back-end.
If I committed code to the front-end code-base then only the build
CI front-end should be triggered and not CI back-end.
This is achieved in Azure DevOps by having two different azure-pipelines.yml
files one for each build with an explicit inclusion path.
Creating the builds
To achieve this behaviour you’ll need to create a build definition for every
code-base for which you need a build.
In our simple example,
there are two code-bases. A front-end and a back-end code-base,
below is the example of the back-end.
Pay close attention to the trigger part of the YAML build definition,
this is telling Azure DevOps to only run a build if any changed files
match the following path /back-end/* (where * is
a wildcard character).
trigger:
    branches:
      include:
      - master
    paths:
      include:
      - /back-end/*

pool:
  vmImage: 'ubuntu-latest'

steps:
- script: echo Run back-end build
  displayName: 'back-end build'
The next step will be creating the pipelines themselves. The steps can be found on Microsoft’s Docs. Once you get to the Configure stage, select Existing Azure Pipelines YAML file. You will see a drop down of all the YAML files in the repository. Create a pipeline for each YAML file.


Now, if code is committed and pushed into the front-end folder, then only the build for the front-end will be triggered.

Similarly, if code is committed and pushed into the back-end folder, then only the build for the back-end will be triggered.

And finally, if code is committed and pushed into the back-end and front-end folders, then both builds will be triggered.

The advantage to this approach is that:
- The build definition for a particular code-base is in the same folder as the code-base;
- The build definition is fully source controlled;
- Builds are only triggered for changed or effected code;
- Multiple builds can be run if multiple code-bases are changed; and
- The build is re-triggered if the build definition itself is changed.
Pull Request Branch Policies
Ensuring a build is run before a change is merged into master is a practice
that teams should employ. It shifts testing to the left and minimises
the risk that the master branch isn’t able to be deployed. Whilst it isn’t
within the scope of this post to discuss the strategies of pre-merge builds,
generally, having a subset of automated tests run prior to
the merge into master strikes a good balance between speed of
code integration and confidence in the resulting artifacts.
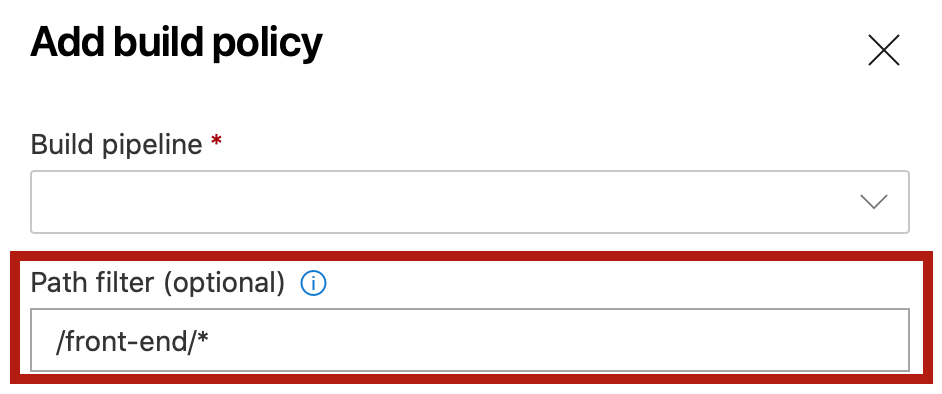
To achieve the desired
pull request policies on Azure DevOps
a Path filter must be set on the master branch for each code-base
in the monorepository.
In the case of the example repository above:
- A policy with a path filter for
/back-end/* - A policy with a path filter for
/front-end/*
The result of this is similar to the CI trigger, however, the builds are
run prior to the merge into master.
Checking history
Developers often need to check the change log of a particular code-base.
In a monorepository setup, this can be achieved by using the git log
command followed by the code-base that is under examination.
For example, the history of the front-end code-base in the above example
would be:
git log front-end
Conclusion
In many cases, development teams do not need to split up all their system components into multiple code-bases. Monorepositories provide development teams with the flexibility to setup multiple code-bases in addition to configuration options, so that they can setup a robust code delivery process, serving them all the way into production.